

Exporting Altium to IPC-2581
Instead of supplying your Altium design files, you can provide an IPC-2581 export along with a BOM and a netlist file.
Sometimes you are in a position where you can't provide CircuitHub with your Altium design files, or maybe you would prefer not to, and in these cases you can make use of the generic IPC-2581 data interchange format.
IPC-2581 is one of the newer data interchange formats in the electronics manufacturing industry allowing EDA tools to convey to factories all the required information to successfully realize a design.
Unfortunately various EDA tool vendors have varying levels of support for IPC-2581, meaning that a single IPC-2581 file is not sufficient to successfully realize a design. This is the case for Altium's current level of support for IPC-2581, but luckily supplementing the IPC-2581 export with an IPC-D-365A netlist file is all that is required.
In this article we will go through how to export your Altium project to IPC-2581, CSV BOM, and IPC-D-356A netlist files which you can then upload to CircuitHub.
Exporting IPC-2581
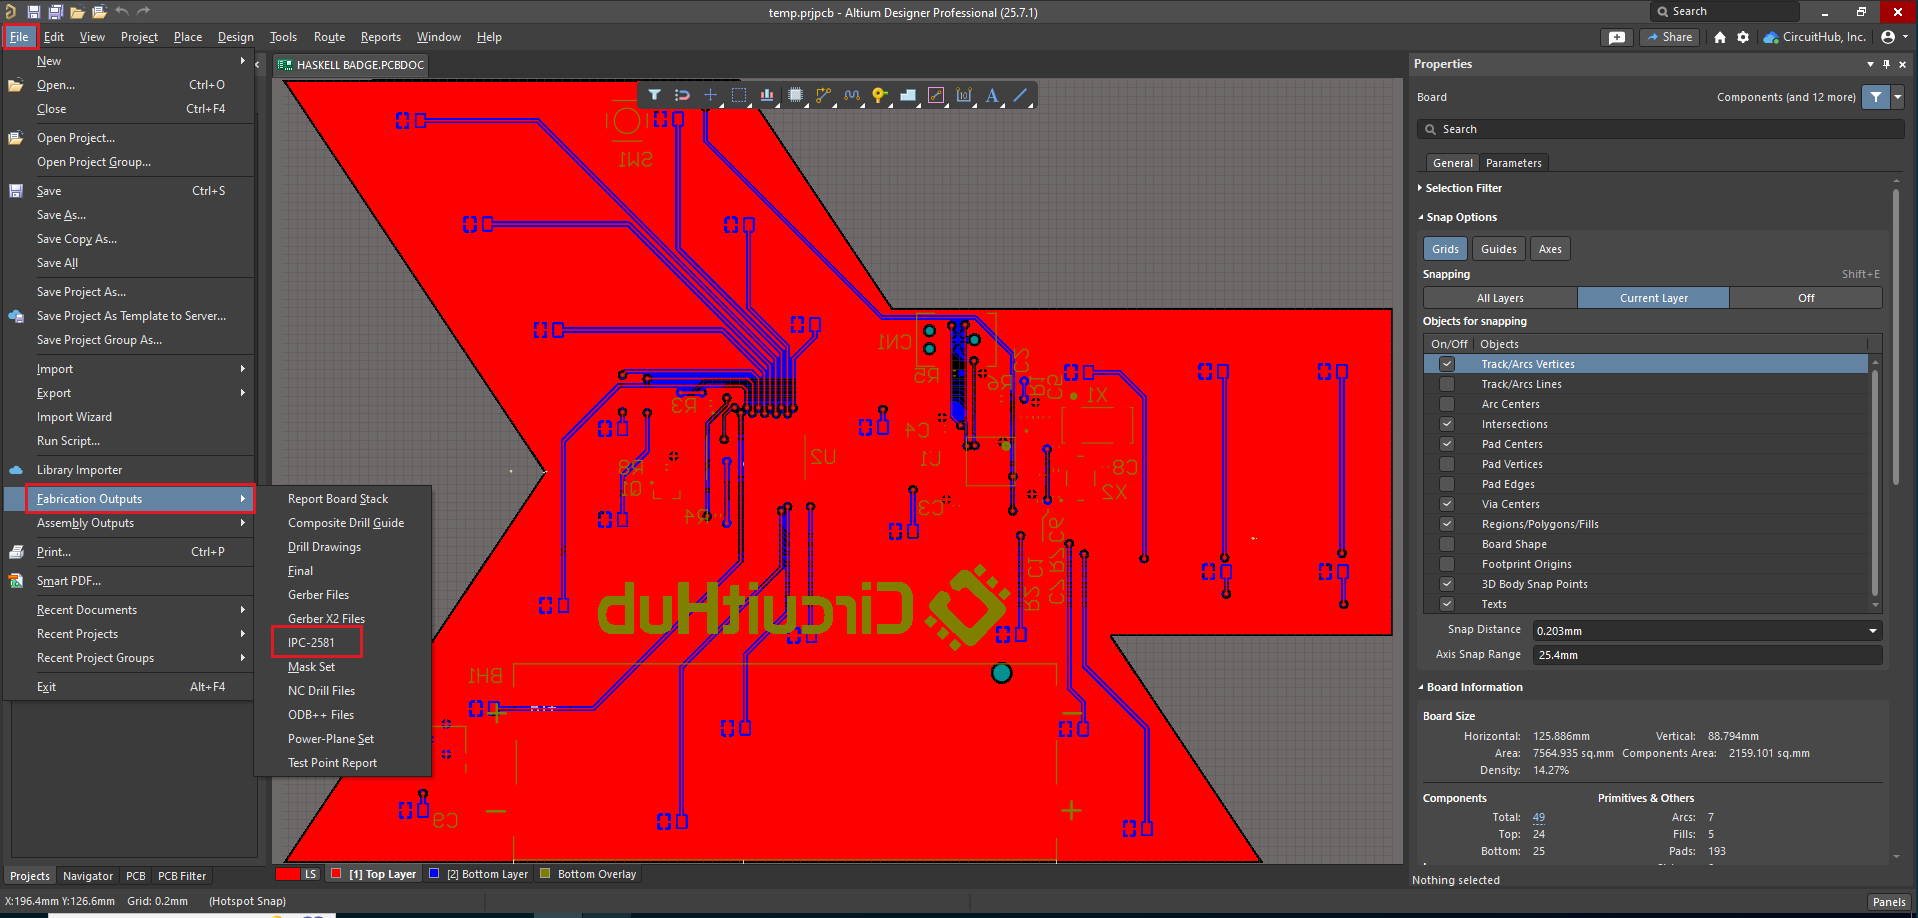
Open your board file inside your Altium project and then select File -> Fabrication Outputs -> IPC-2581 from the menu.
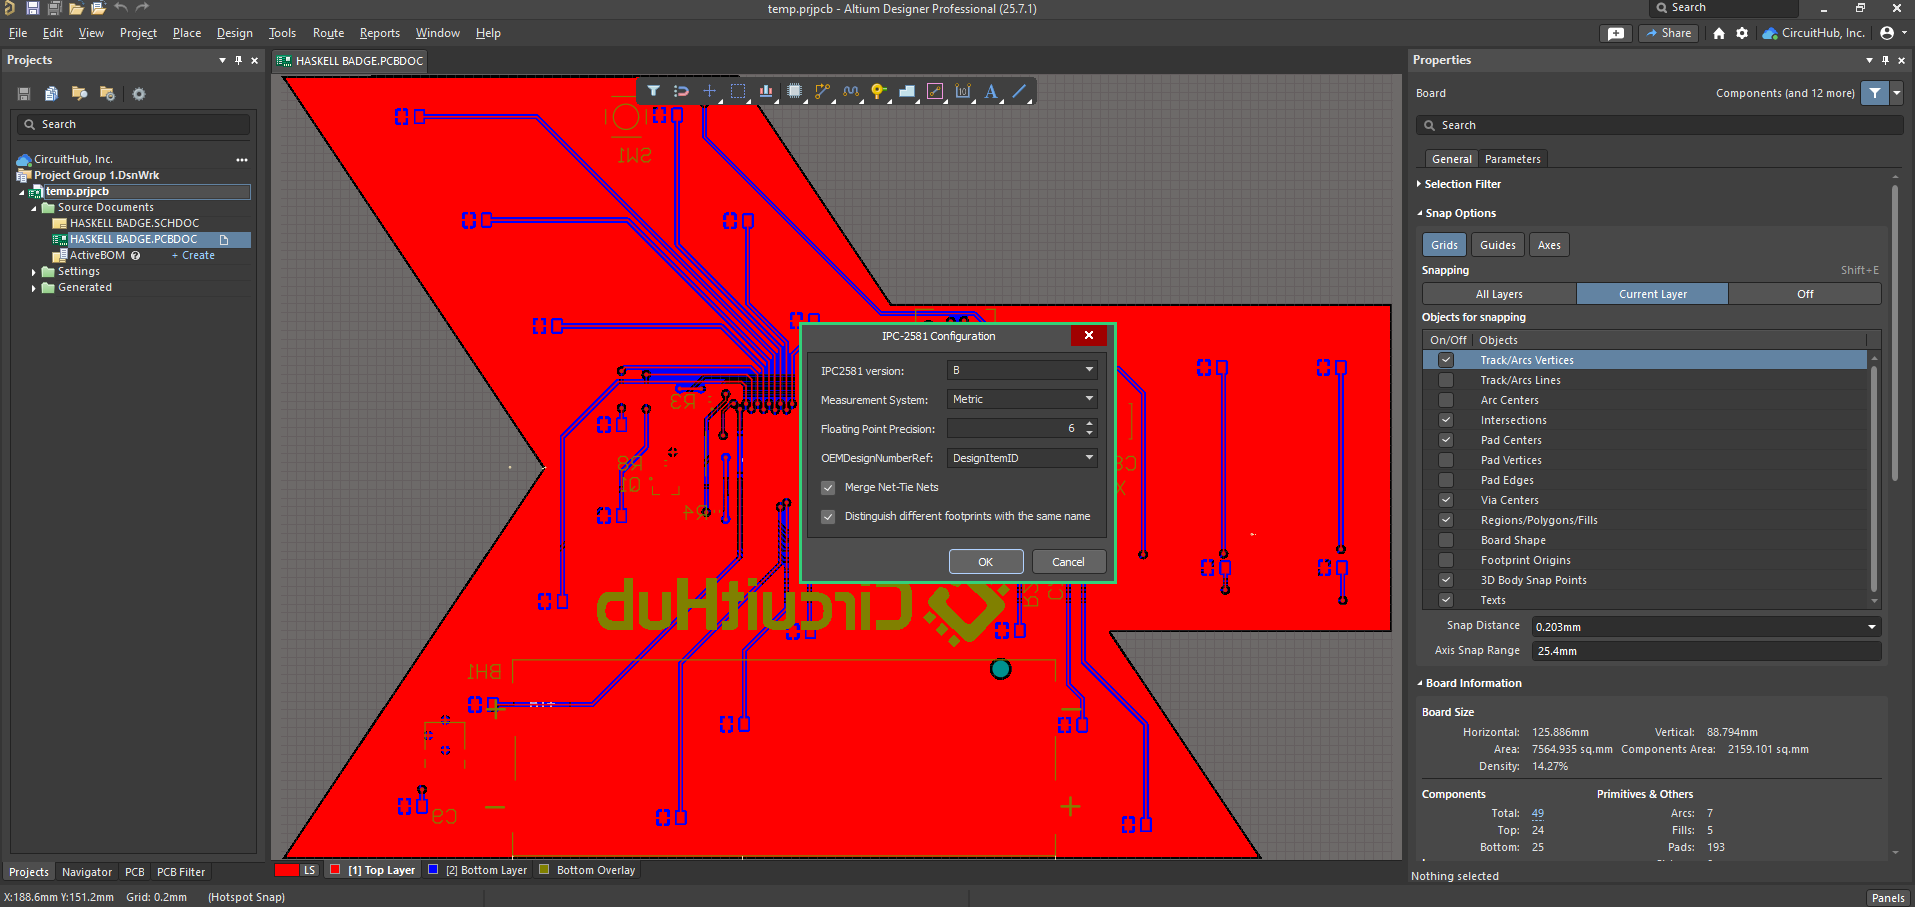
In the dialog box that pops up select the following parameters and click OK.
- IPC2581 version: B
- Measurement System: Metric
- Floating Point Precision: 6
- OEMDesignNumberRef: DesignItemID
- Merge Net-Ties Nets: yes
Distinguish different footprints with the same name: yes
The file will probably be saved in the folder "Project Outputs for <your_project_file_name>" relative to your project folder as the file "<your_board_file_name>.cvg" where <your_project_file_name> is the name of your project file with extension .PrjPcb and <your_board_file_name> is the name of your board file with extension .PcbDoc.
Exporting IPC-D-356A netlist file
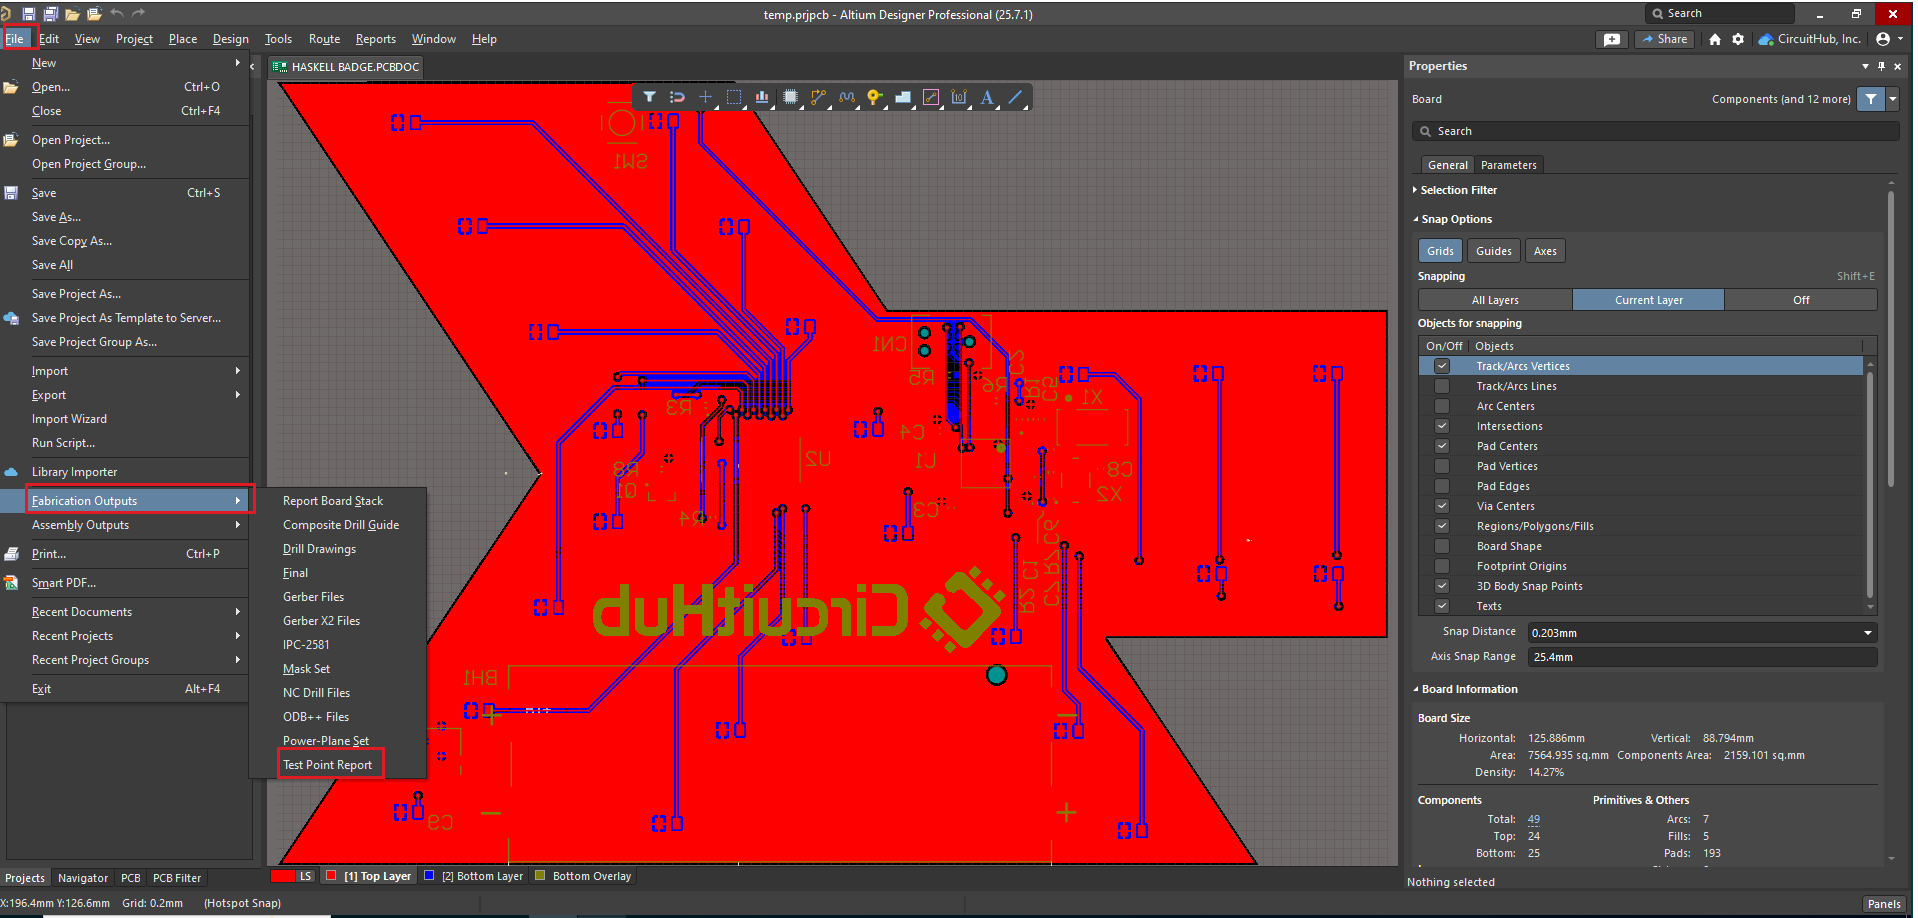
Open your board file inside your Altium project and then select File -> Fabrication Outputs -> Test Point Report from the menu.
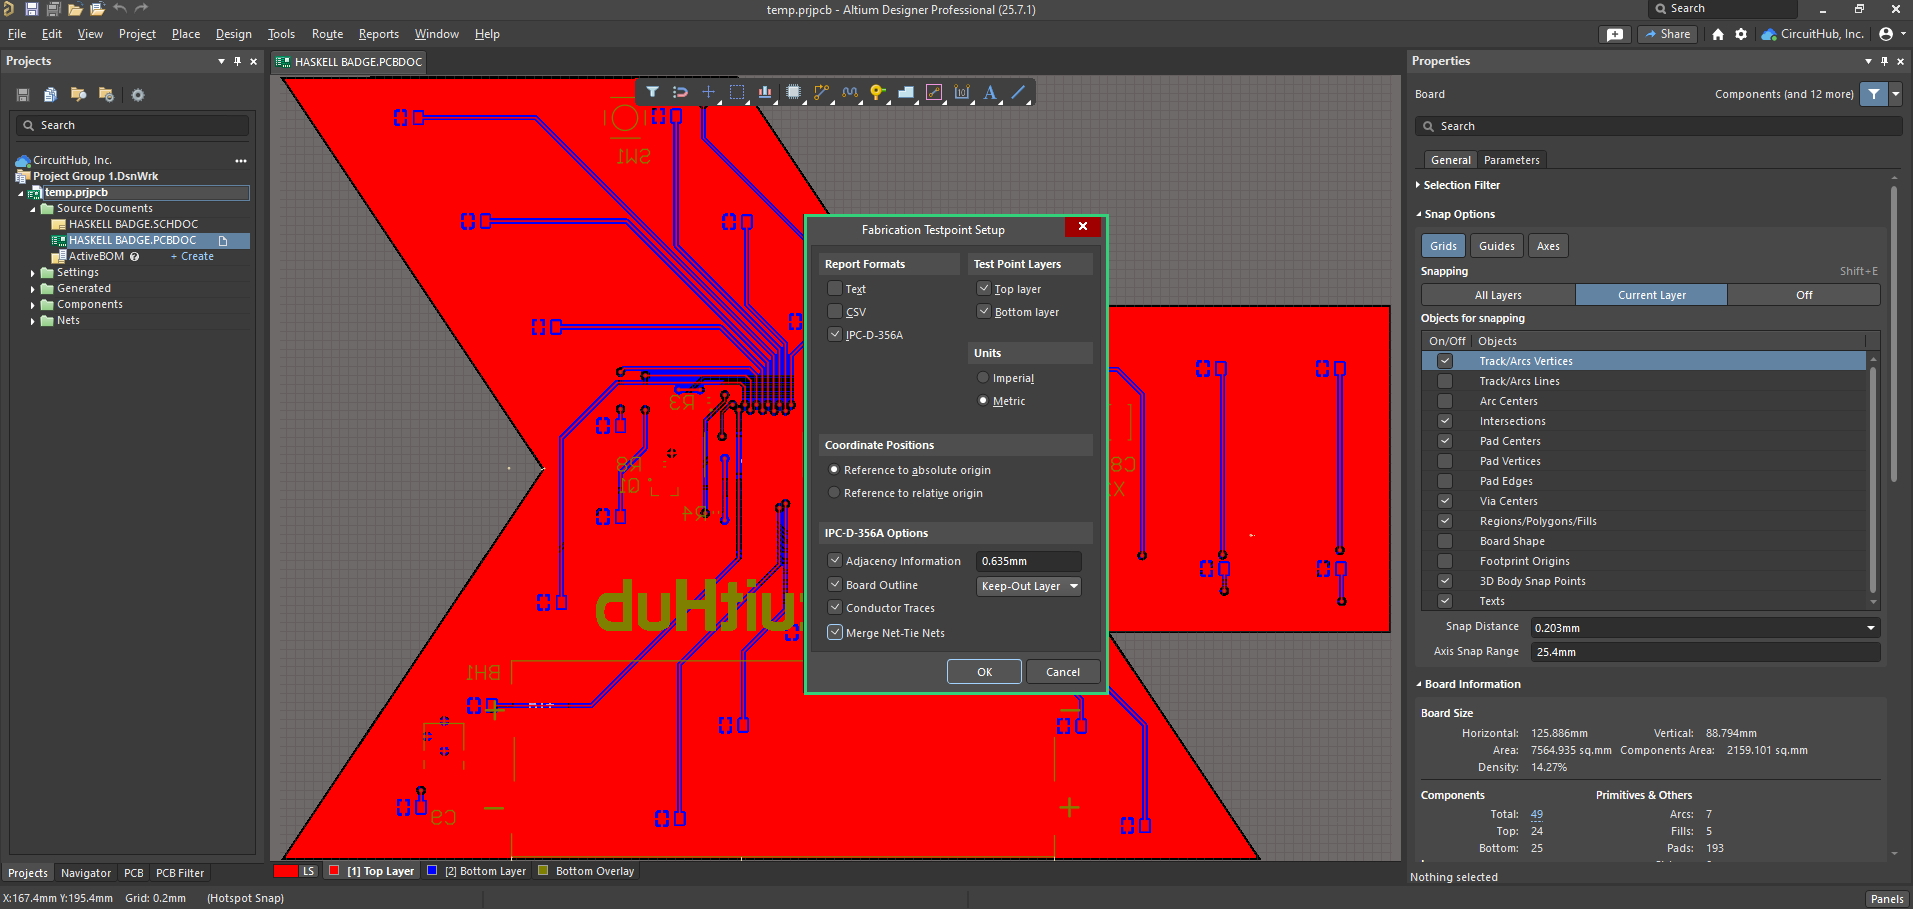
In the dialog that pops up select the following parameters and click OK.
- Report Formats: Only select "IPC-D-356A"
- Test Point Layers: Select both "Top layer" and "Bottom layer"
- Units: Metric
- Coordinate Positions: Reference to absolute origin
- IPC-D-356A Options: select all the options
- Adjacency Information: selected
- Board Outline: selected
- Conductor Traces: selected
- Merge Net-Tie Nets: selected
The file will probably be saved in the folder "Project Outputs for <your_project_file_name>" relative to your project folder as the file "Fabrication Testpoint Report for <your_board_file_name>.ipc" where <your_project_file_name> is the name of your project file with extension .PrjPcb and <your_board_file_name> is the name of your board file with extension .PcbDoc
Exporting a CSV BOM
The CSV export for the BOM needs to conform to the format expected by CircuitHub which is described in the article "Supplying a BOM as a CSV / spreadsheet".
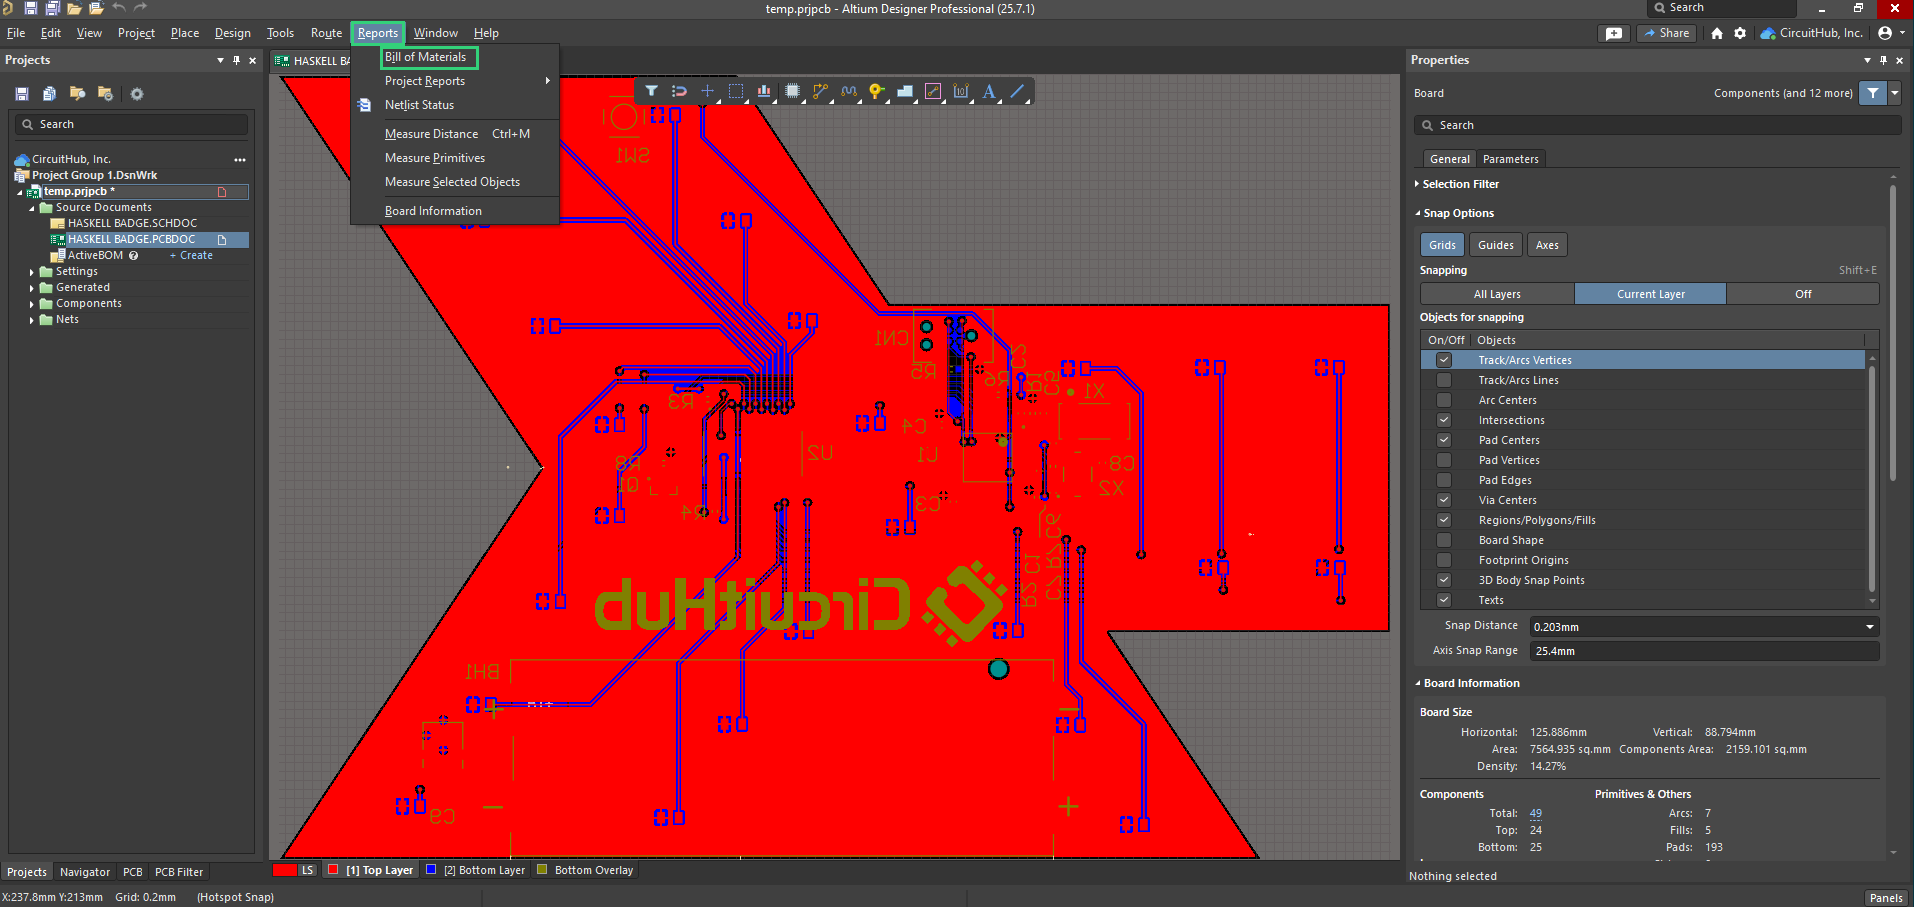
Open your board file inside your Altium project and then select Reports -> Bill of Materials from the menu.
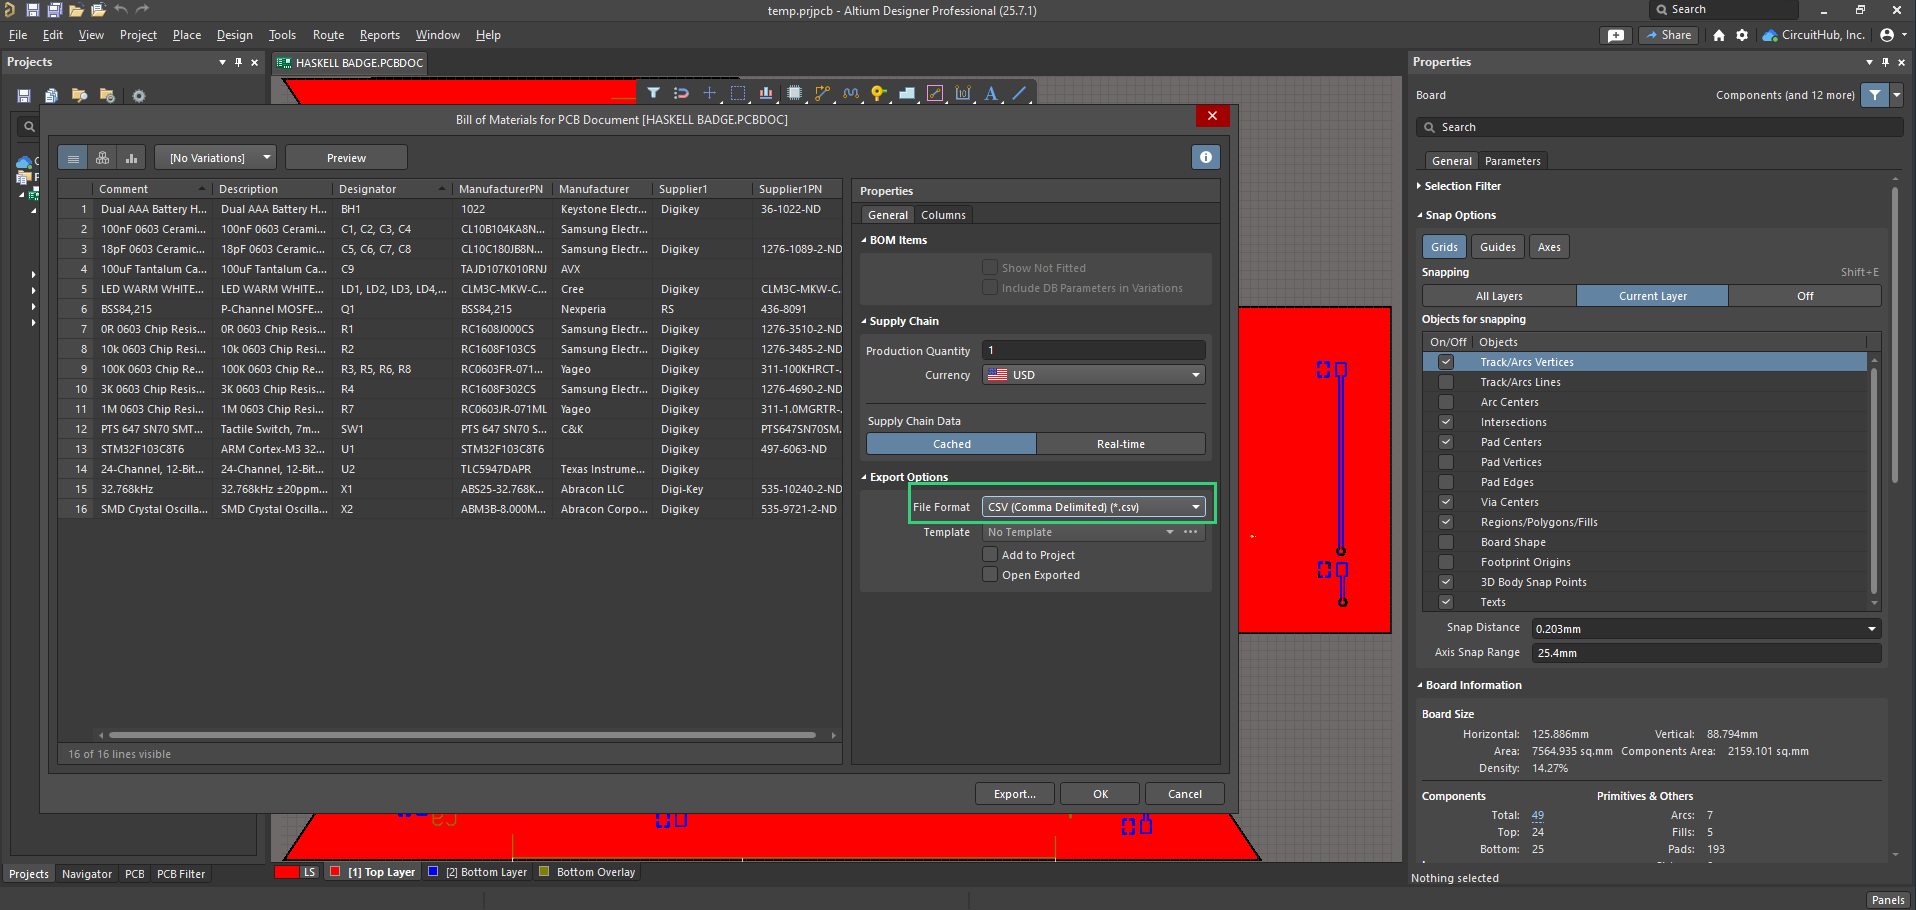
In the dialog that pops up ensure that "File Format" under "Export Options" is set to "CSV (Comma Delimited)(*.csv)"
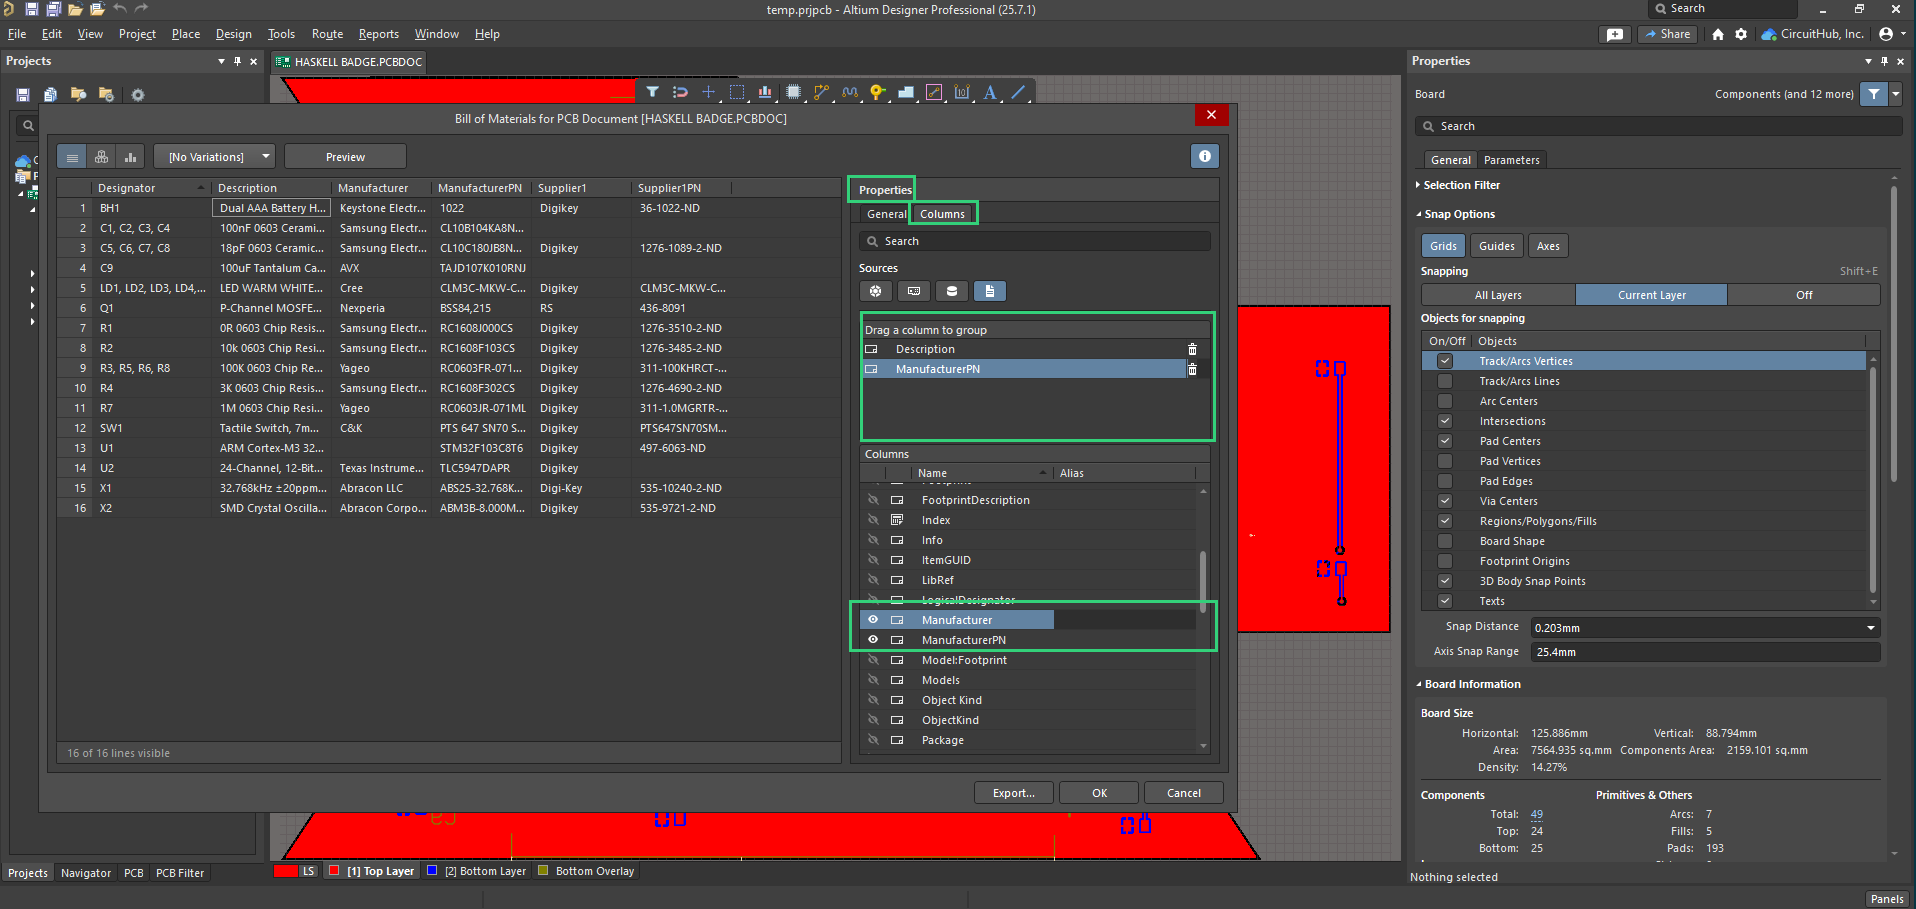
The following columns are included in the export
- Designator - See the "Reference Designators (Required)" section.
- Description - See the "Description (Optional)" section.
- Manufacturer - See the "Manufacturer (Optional)" section.
- Manufacturer Part Number - See the "Manufacturer Part Number (Required)" section.
and optionally include the following columns
- Supplier - See the "Supplier (Optional)" section.
- Supplier Part Number - See the "Supplier Part Number (Optional)" section.
Also make sure that grouping is set to by the description and manufacturer part number columns.
You can modify what columns are added and the column grouping in the Columns tab under the Properties section.
When you are ready click on the Export... button, the default save location will be in the folder "Project Outputs for <your_project_file_name>" relative to your project folder and the filename will be "<your_project_file_name>" where <your_project_file_name> is the name of your project file with extension .PrjPcb.
Upload your files to CircuitHub
Upload your .cvg, .ipc and .csv files you exported above to CircuitHub at https://app.circuithub.com/upload