

Projects
Prepare a PCB design for quoting and manufacturing in CircuitHub.
In CircuitHub, a project is where you prepare a PCB design for quoting and manufacturing. It brings together your EDA files and BOM with component sourcing and board requirements. Once the design is configured, you can compare quotes across quantities and lead times and place an order for manufacturing.
From design files to a quote
1. Import your design files and BOM
Select New project and upload the original schematic and board files from your EDA tool, or upload a supported IPC-2581 export. You can also supply a CSV BOM to provide additional manufacturer and part-number information.
After import, CircuitHub extracts the board, component placements, and BOM data used to prepare the project for quoting.
2. Resolve components and sourcing
Use the Parts tab to review the BOM and decide which components should be fitted. You can approve parts and substitutes, search the CircuitHub parts catalog, add a custom part, or mark placements Do Not Place (DNP).
For each fitted component, choose how it will be supplied:
- CircuitHub can purchase it from a supported distributor.
- You can provide custom sourcing information or registered pricing.
- You can consign eligible parts that you already own.
CircuitHub checks whether approved purchasing options have enough stock for the selected build quantity. Missing approvals or insufficient stock must be resolved before an orderable quote is available.
Changes to placements, approved parts, or sourcing automatically start a new quote. See BOM and parts overview for the complete workflow.
3. Configure the board and inspect the design
Use the Board tab to review specifications extracted from your design files and enter the requirements CircuitHub should use for quoting and manufacturing. These include the stackup, thickness, copper weights, material, finish, colors, vias, panelization, impedance control, and custom requirements.
Some requirements may need manual review before a complete quote is available. See the Board overview for detailed configuration guidance.
Use the Viewer to inspect the top and bottom of the PCB or view individual layers. You can overlay component placements and filter by reference designator to visually check the imported design.
The Viewer is for visual verification. Enter manufacturing requirements in the Board tab rather than relying on the preview.
4. Compare quotes
Choose a build quantity and ship date at the top of the Project page. CircuitHub calculates the available quote using the board requirements, fitted components, sourcing, assembly, and current availability.
Open the price to see the estimated board, parts, and assembly costs. Use Quote Explorer to compare how pricing changes across available quantities and lead times.
Changes that affect manufacturing or sourcing trigger a new quote automatically. The Project page shows when pricing is being refreshed and identifies anything that prevents an orderable quote.
The page also shows when the quote expires. Locking a quote extends its validity and temporarily prevents changes to the BOM, board configuration, and firmware.
Place an order
When the project and quote are ready, select Proceed to order.
- Review the board preview and summaries of the parts and board configuration.
- Confirm that you have reviewed and approved the design.
- Choose a shipping address and shipping service.
- Choose a payment method and provide a purchase order number when required.
- Review the project, shipping, tax, and total cost.
- Select Place order.
The order records the design and configuration that you approved. See Place your first order for the complete checkout workflow.
Update your design with revisions
A revision is a version of the EDA files and BOM within a project. Add a revision when the underlying design changes but should remain grouped with the existing project.
Each revision can be reviewed, configured, quoted, and ordered separately. Previous revisions remain available, so you can switch between versions and return to an earlier design when needed.
Add a revision
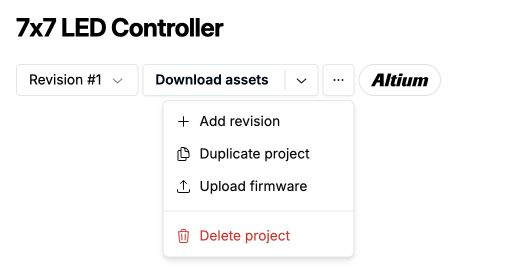
- Open the project actions menu at the top of the Project page.
- Select Add revision.
- Upload the updated EDA files and BOM.
- Wait for the import to complete.
- Review the parts, board configuration, and new quote before ordering.
Use the revision selector at the top of the Project page to switch between versions.
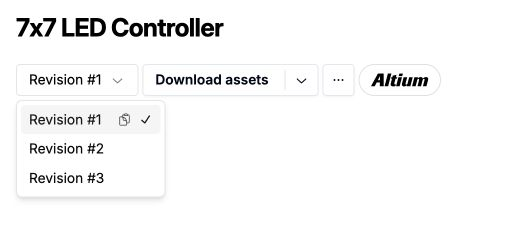
Always confirm that the intended revision is selected before reviewing a quote or placing an order.
What carries forward to a new revision?
CircuitHub carries information forward for matching BOM lines to reduce repeated reconciliation work:
- Placement DNP/DNF status
- Approved and automatically reconciled part substitutes
If the new CSV BOM explicitly defines DNP or DNF status, the CSV takes precedence because it represents the latest design intent. Review any carried-forward selections when references, footprints, or part requirements change.
Revision or duplicate?
Create a new revision when the files represent another version of the same design. Duplicate the project when the copied design should be managed independently with its own name, workspace, and revision history.
Find and manage projects
Find and organize projects
The Projects area shows the projects in the selected workspace. If a project you expect is missing, check the workspace selector at the top left of CircuitHub.
Organize projects with tags
Expand a project's details to add tags. Tags can represent products, teams, clients, development stages, or any other grouping useful to your organization.
Use tags, filters, and search to find related projects.
Share access with a workspace
Projects belong to a workspace and are available to that workspace's members. Add a colleague to the workspace to give them access to its projects. If a design should be managed independently in another workspace, use the project actions menu to duplicate it into that workspace.
See Workspaces to invite colleagues and understand workspace access.
Download project assets
Download the assets for the selected revision from the controls at the top of the Project page. The ZIP archive contains the BOM as a .tsv file, the uploaded design files, and Gerber files generated from the design.
The project actions menu also lets you upload production firmware. See Part firmware programming for the requirements.
Delete a project
Projects that have never been ordered can be deleted by opening the project actions menu and selecting Delete project. Projects with an existing order cannot be deleted.
Contact support@circuithub.com if you need help with a project you cannot delete.